 |
Magic File Renamer Help
|
Index > Operation
> User Interface > Rename List
The Rename List lists the files and folders which were selected for rename, let
you preview changes to those items, let you sort the items before renaming and
much more.
Adding items to Rename List
-
You can add items by either from the File Explorer,
or by dropping files from any Windows Application, e.g. Windows Explorer, on
the rename list.
-
Adding files from the File Explorer can be done by drag and drop operation, or
by pressing one of the two "add" Buttons in the top left corner.
-
The top-most add button will add selected items from the File Explorer to the
Rename List. This is similar to dragging the selected items onto the Rename
List.
-
The second add button will add all the items shown in the current folder of the
File Explorer to the Rename List.
-
You can use the Options Window to
customize which items will be added.
-
Only files and folders matching the wildcards masks and the exclude masks in
the File Explorer will be added. Hidden Items will
be added only if Show Hidden/System Files is checked
in the File List Menu.
This applies also to items added recursively.
-
See Sort section
below to learn the how added items are sorted.
-
Pressing the Alt
key while dragging items from File Explorer or outside source to Rename List
will clear it.
-
Total number of items in the rename list is shown in the Status
Bar.
-
Rename List can contain a large count of items. Fields for items are read in a
"just on time" basis, which means that on some cases, you may notice some
delays when scrolling the rename list.
-
Item cannot appear more than once inside the rename list.
-
Add and remove operations has shortcut keys to ease operation. Shortcut keys
are displayed in the Rename List main menu.
-
You can also add items to the Rename List by using Command line
parameters.
Removing items from Rename List
-
Clicking the Remove Selected Items button (Third in
the left toolbar), will remove selected items from the Rename List. Pressing
the Delete
key will do the same.
-
Clicking the Clear Rename List button (4th in the
left toolbar), will clear the rename list.
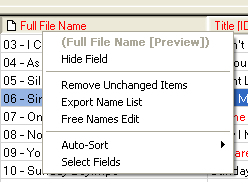
Selecting fields to show
-
You can select which rename list columns will be shown from a wide variety of
available fields. To do so, select Select visible Fields
from Rename List menu, or right click on one of the
column headers, and select Select Fields from the
displayed menu. Then use the Field Selector
window to select fields.
-
You can also add preview columns for fields that can be changed. See
Preview section.
-
You can hide one of the columns by using the Field
Selector, or by right clicking on one of the column headers, and select
Hide Field
to hide the particular field.
-
Currently shown columns and their widths will be saved for the next session.
You can also save current column settings as a preset. See
Saving a preset.
Preview
-
You can watch the expected effect of the filters
you apply
on the items in the rename list.
-
Any changes can be previewed, including changes in
MP3 ID3 tags and moving to different folders
-
The preview is calculated instantly, on each change in
applied filters
configuration or change to the rename list.
-
To watch changed to a specific field, e.g. to the ID3 Artist field, add a
preview column of this field to the rename list using the
Field Selector. See Selecting fields to show.
-
Preview columns can be identified by the red text color of the column header.
-
For each item, if the text of a field is in shown in red, that means that this
field will be changed by the current applied
filters.
-
Preview may fail fore some or all of the items. In this case, failed items will
be highlighted, and will be ignored when
applying changes.
-
Disabling Auto-Preview
-
When Rename List contains a large count of files, the auto-preview may take
some time, and you might want to disable it.
-
You can disable auto-preview by clicking on the Preview
push-button in the left tool bar (6th button) or from Rename List Main Menu.
-
Canceling a preview while in progress also disables auto-preview.
-
Click on the Preview
button again to enable auto-preview.
-
Total count of items which will be changed by current
applied filters is shown in the Status Bar.
Sort
-
You have full control on how items in Rename List are sorted. Items sort order
can be set manually or automatically.
-
Auto-Sort:
-
You can configure the rename list to auto-sort the items in it. In this mode,
you define the field or multiple fields you wish to sort by, and when adding
new items to the rename list, the rename list will be resorted automatically.
-
To activate auto-sort by a specific column, click on the column header you wish
to sort by. Clicking again on this column will inverse sort order.
-
Alternatively, you can define multiple sort fields using the
Advanced Sort Editor. Select Select Sort Fields
from Rename List main menu, or Auto-Sort
> Advanced
from any column header right-click menu.
-
You can add a column to the sort also by selecting Auto-Sort
> Add This Fields
from any column header right-click menu.
-
When auto-sort is activated, the Auto-Sort
button in the left tool-bar (5th button) is pushed.
-
You can cancel auto sort by clicking on the auto-sort button or by selecting
Auto-Sort > Cancel
from any column header right-click menu.
-
Current sort settings are saved in the configuration file for next time you
start MFR.
You can also save current sort settings as a preset. See Saving
a preset.
-
Auto-sorting forces MFR to read field values for all the items in rename list.
This might take some time when Rename List contains large amount of files, or
when the specific field read time is slow (e.g. ID3 tag fields). You may want
to cancel auto-sort in those cases.
-
Manual Sort:
-
To sort items manually, use the up and down arrows in the right tool-bar.
Selected items will be moved inside the rename list accordingly.
You can also press Ctrl-Up and Ctrl-Down
to move selected files.
-
You can also drag and drop selected items inside the rename list to manually
sort them. In this case, the red marker marks the position to which the items
will be moved. To drag a group of selected items, drag from the focused cell
(in light blue).
-
Manually moving files will deactivate auto-sort.
-
In manual sort mode, the Auto-sort indicator button in the left tool-bar is not
pushed.
-
When adding files to rename list in manual sort mode, items will be added below
the selected item, or at the end of the list if no item is selected. To
deselect all items, click on the last row in rename list.
-
Sort by a preview column:
-
Clicking on a preview column will sort the rename list one time by the
current
preview values of the selected column.
-
Clicking again will inverse sort order.
-
Note that when some of the applied filters
relies on item positions in rename list, e.g. Counter
or Name List
filters, preview values may change again.
-
Sorting by preview column deactivate auto-sort.
-
Works only when auto-preview
is enabled.
Manual Rename
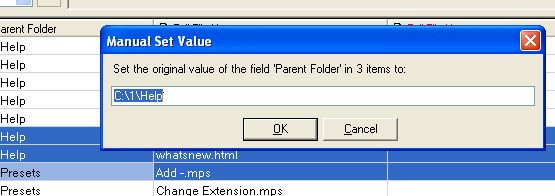
-
A useful feature of MFR let you modify values of fields in rename list
manually.
-
You can modify values for any text field that supports changing, including ID3
tags and full paths.
-
You can modify the initial value of the field (before performing preview) and
the final value of the field (after preview, overwriting preview value).
-
The changes are applied only when filters are applied pressing to
GO!
button.
-
To change value of a field, select the item or items you wish to change, and
make sure that the focused cell is in the column you with to change. Then press
F2 or select Manual Rename Field
from the menu by right clicking on the item.
-
To change initial values, perform manual rename on an original field column.
-
To change final values, perform manual rename on a preview field column.
-
Fields which were manually renamed, are marked with blue text.
-
To cancel manual renaming for an item, you can right click on the manually
renamed field and select Cancel Manual Rename
from the menu.
-
To cancel manual renaming for all items in list, refresh
the Rename List by pressing F5.
-
Changing values for more than one field will change field values for all items
to the same value. Note that when changing file names, you must ensure each
file name in the same folder is unique.
-
Some fields require specific format, e.g. ID3 Track Number must be numeric. Be
sure to input values in the correct format.
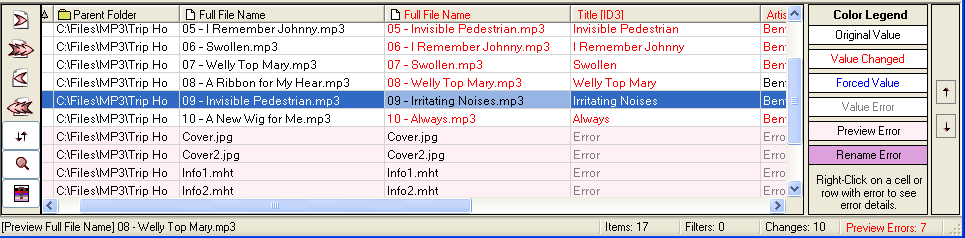
Highlighting
-
Each Rename List Item and it's individual fields can be displayed in number of
foreground and background colors, which indicates it's status.
-
Pressing the
 button in the left tool-bar
will show/hide a quick color-legend view.
button in the left tool-bar
will show/hide a quick color-legend view.
-
Preview fields (cells) displayed in red text,
indicates that this field will be changed by the current
applied filters.
-
Fields (cells) displayed in blue text, indicates that
this field was manually renamed.
-
Items displayed in gray text
were not found. Those items might were deleted or renamed since adding to
rename list.
-
Fields (cells) displayed with the value [Error] cannot
be displayed. e.g. field that shows ID3 title for a text file.
To see details about the error occurred, right click on the cell with error and
select Show Field Error
from the menu.
-
Items displayed with pink
background and gray text had preview
errors in the last preview. Those items will be ignored when
applying changes. To see details about the preview error occurred,
right click on the item with error and select Show Preview
Error from the menu.
Total count of items with preview errors is shown in the Status
Bar.
-
Items displayed with plum background
had apply errors in the last apply (GO!)
operation. To see details about the error occurred, right click on the item
with error and select Show Rename Error from the
menu. You can cancel highlighting of last apply errors by refreshing
the Rename List. You can filter Rename List to show only items that had rename
errors in the last rename operation by selecting Show Last
Rename Errors from the right-click menu.
Remove Unchanged Items
-
You can command the rename list to remove all items in which a specific field
is not predicted to be changed by the current applied
filters.
-
To do so, right click on the preview column header of the field you want to
filter by and select Remove Unchanged Items.
-
Example: to remove all items in which the creation date is not predicted to be
changed, add a creation date preview column to the rename list using the
Field Selector, right click on the column header and select
Remove Unchanged Items.
Export Name List
-
You can create a text file from any column in rename list. Lines in the file
will be the field values matching the items in the rename list.
-
Right click on the header of the column you want to create list from and select
Export Name List.
Free Names Edit
-
This feature allows you to easily use any text editor to freely edit the values
of any writeable column. You can, for example, use a text editor which supports
macros to perform advanced editing.
-
Right click on the header of the column you want to edit. The column must
support writing. Then select Free Names Edit
from the menu.
-
A temporary name list file will be created from the selected column, and a
matching Name List Filter will be added to
the Applied Filters List.
Click the edit link in the Name List Filter editor to edit the names with the
default editor.
Refresh
-
The refresh feature reread all fields for all files in Rename List and
recalculate the preview.
-
Press F5 or select refresh from any item's right click menu to perform a
refresh.
-
Refresh may come handy when some of the files in the rename list were changed
by another program.
-
Refresh also reset manually changed fields for all
items, and remove highlighting of rename errors
from the last rename operation.
More features
-
Locate
This feature allows you to synchronize between the rename list and the
File Explorer. Press F4 or select Locate
by right clicking on any item (file or folder), to locate it in the file
explorer.
-
Properties
You can display the Windows Property Sheet for any item in the Rename List by
pressing Alt-Enter when this item is selected, or by
selecting Properties
by right clicking on any item.
-
Drag Items and Cells
You can drag items from rename list to any windows application that accept
files, e.g. Windows Explorer.
You can also drag items or cells to filters which supports accepting items or
cells. E.g. the format string in formatter filter accepts cells from rename
list, and the ID3 setter filter accepts MP3 files in the drop area (top-right
corner).
-
When the mouse is over a cell in Rename List, Status Bar
shows the full text in this cell, or an error message in case of a field error.
See Also:
Rename List Fields
File Explorer
Applied Filters List
Applying Changes